Low Carb Chocolate Bourbon Mug Cake

17 Dec

Converting to a low carb lifestyle has had its ups & downs. At the start of our journey, both Scott & I encountered times in which we would have eaten the cardboard box our Amazon goods arrived in, out of sheer desperation. If you would have asked us on Day 4 if this is something we could live with long-term, we would have eaten your first born told you that neither of us thought this is something that would last past Week 1. Barring a small miracle, we likely would have not made it to the end of Week 2 if it weren’t for my personal tenacity and Teutonic nature.

Fast forward to Week 29, and I can easily look at a plate of Christmas cookies and simply shrug my shoulders in deflated enthusiasm. Never in a million years would I have ever thought I could come to this point and, in hindsight, I realize now just how much of a sugar addict I was. Nowadays, I rarely crave sugary or carb-laden foods, but around that special time of the month occasionally, I have a hankering for something other than cheese or salami. A while back, probably about a month into our new lifestyle, I invested in a 48oz bag of Erythritol. It’s a natural sweetener, a sugar alcohol with zero digestible carbs and is often used within the diabetic community. It measures 1:1 like sugar, and tastes practically the same though when eaten in large quantities can cause a bit of stomach upset for some people. Since we eat so little of it in one go, it works well for those times in which we want something sweeter.

The chocolate mug cake below came from a fabulous low carb blogger named Kim, aka ‘Low Carb Maven’.  I did make a few adjustments as I wanted it a tad sweeter and boozier more festive, but check out her original recipe. It’s a winner, for sure!

IMG_2506

LOW CARB CHOCOLATE BOURBON MUG CAKE

Inspired by Low Carb Maven

– 2 Tbsp of almond flour, sifted

– 1 Tbs of unsweetened natural cacao powder, sifted

– 1 to 1 ½ Tbsp of 1:1 sugar substitute/sweetener  (I used Swerve)

– ¼ tsp of baking powder

– 1 Tbsp of mayonnaise

– 1 large egg yolk

– 1 tsp of Bourbon (or water, or another liquor of your choice)

– ¼ tsp of vanilla extract

Sift all dry ingredients into a microwave-safe cup or ramekin. Add egg yolk, mayo, Bourbon and vanilla extract, and mix well with a fork until it’s all incorporated and looks like a thick batter.

Microwave on high for 50-60 seconds.

Top with sugar-free whipped cream or keto-friendly ice cream for a real treat, but the cake itself is pretty tasty as is. Enjoy!

Low Carb Mississippi Pot Roast

12 Dec

I know.  Sigh…

I’ve utterly neglected my blog. Again. Have I mentioned I work full-time? It’s an excuse, really, as I’ve had plenty of time watching re-runs of ‘This is Us’ (and who doesn’t LOVE that show?!) or catching up with the Food Network on weekend mornings. I just haven’t really felt all that inspired to write, I guess.

Anyway, I must bring you up to speed with that fact that I am fully converted to the Keto religion. That’s right, we drank the keto cool-aid!

It happened like most things in my household: haphazardly and completely unprepared. Scott had been feeling sideways and came home from a doctor’s appointment suggesting we try keto. I had no idea what the keto diet was all about or what it entailed, but I’m not one for leaving my man in the lurch, so I enthusiastically told him: “Let’s do it, babe!”. And that was that. I was committed in that instant.

It wasn’t until the next day, when I read about it online, that I realized I was dead I was done eating croissants and lasagna. Belgian chocolate, my trusted old friend, it has been nice knowing you… Yelp.

Honestly, I thought that giving up bread, pasta & chocolate would be the toughest part, but that went remarkably easy once my body became sugar-free after about a week. It’s both completely foreign & satisfying to look at a chocolate croissant and have absolutely ZERO cravings or desire for it. Ditto on that plate of baked ziti or that honk of crusty French bread. No. The hardest for me, was to give up fresh fruit. And I occasionally have fond memories of pasta, but I’m not per se craving or desiring pasta anymore. Strange, huh?

We embarked on our keto journey last 22nd June 2018, and 36 pounds lighter later, I haven’t looked back since. Eating sugar-free and mostly carb-free is the new normal for me, and I haven’t felt better. Better yet, in my nearly 6 months of keto-life, I’ve discovered that almost anything can be made low carb. I love to cook and I can easily adapt trusted old favorites to fit our new lifestyle with the help of a carb tracker app I found. If we eat out, most restaurants have low carb options available and/or will generally be happy to accommodate your wishes… you just have to ask if not on the menu. Some creativity with cooking will help you along as well.

The recipe below is a new favorite I found online, and so easy, it should be arrested by the culinary police. You can make it even lower in carb by foregoing the store-bought seasoning packets and creating your own… but at 6 net carbs for a whole serving, it’s just not worth my time.

th

MISSISSIPPI POT ROAST

Not sure where this recipe originated, but I’m gonna go out on a limb and say it was in Mississippi… and what a fine State for discovering this gem!

– 3.5 lbs of chuck beef or stew meat

– 1 [16oz] jar of whole pepperoncini peppers

– 1 package of ranch seasoning mix (any kind, approx. 1 oz)

– 1 package of “au jus” or “brown gravy” seasoning (any kind, approx. 1 oz)

– 1 whole stick (8 Tbsp) of grass-fed butter (like Kerrygold, Vital Farms or other good quality brands…)

Brown the meat in a pan, if you desire a bit of a crust, but it’s not necessary. Place roast in your slow cooker and pour pepperoncinis (complete with liquid and all) around your meat. Sprinkle both seasoning packets over the top, and place ½ stick of butter on top of your roast.

Cook on low for 10 hours and magic happens. I promise you, you won’t regret it… JUST. DO. IT.


Makes 8 generous servings

Total carbs per serving: 6.1 grams

Net carbs per serving: 6.0 grams

Fat: 56.6 grams

Protein: 46 grams

Sugar: 1 gram

Macros: 73% fat, 3.1% carbs, 23.9% protein


Spanish Chicken

10 May

“Braised chicken thighs” sounded so… je ne sais quoi… so I labeled this one ‘Spanish Chicken’. The flavors are reminiscent of a sunny day on Barcelona’s Las Ramblas, sipping cool white wine with a Mediterranean breeze blowing in my hair… whilst being hand-fed marinated olives by Javier Bardem… I took this too far, didn’t I?

I randomly stumbled upon this Martha Stewart original whilst browsing the worldwide web for dinner ideas. The photo looked so inviting that it compelled me into submission. Since I’m terribly headstrong creative, I didn’t really stick to the exact directions. I also added a hefty pinch of saffron threads and substituted white wine for water, cause why have water when you can have wine… said Jesus. (Come on now, MarthaWater?Really?)

This turned out fabulous. And while I served it with mashed potatoes, a good honk of crusty bread would have been a better choice. The chicken juices married with the sweetness of the peppers & white wine, make for a soupy sauce so packed with flavor that it simply commands the superior sopping-qualities of country French bread. The brininess of the olives is there to break through the sweetness of the peppers… and also in case Javier decides to drop in for dinner. Oye. Speaking of delicious olives… I’m sure they’re not extra-virgin. I know. Please forgive me.


SPANISH CHICKEN

For the original recipe, click on the Martha Stewart link above

– a few splashes of olive oil

– 12-15 boneless, skinless chicken thighs

– 3 red bell peppers, sliced into strips

– 3 yellow bel peppers, sliced into strips

– 1 medium-size onion, sliced into strips

– 10 large garlic cloves, roughly pressed or cracked with the flat size of your knife (not chopped)

– 1 28-oz can of whole tomatoes

– 1 15-oz can of plain pitted green olives, drained

– 3 dry bay leaves

– 2 Tbsp of sweet paprika

– 3 Tbsp of fresh thyme

– a hefty pinch of saffron threads

– 1 cup of dry white wine (pick one you also love drinking)

Prep all veggies and set aside. Trim fatty sides of chicken thighs, and salt & pepper them thoroughly.

In a large Dutch oven, over medium-high heat, add a splash or two of olive oil and brown chicken thighs on all sides. Set aside when browned, they do not have to be fully cooked yet.

In the same pot, add onion, garlic & peppers and sauté for 5-7 minutes until starting to get soft. Add olives and tomatoes with their juices, gently crushing the tomatoes into coarse pieces with your hand. Add white wine, bay leaves, paprika, thyme & saffron and season the lot with salt & pepper. Stir and bring to a boil.

Turn heat to medium-low and return chicken & juices to the pot, nestling the chicken thighs into the veggie mixture. Gently simmer for 30-45 minutes until the chicken is fall-apart tender. Remove bay leaves and serve hot.

Cashew Chicken

5 May

Rats.

I think I just blew the ‘Blogger of the Year’ award with my 14-month hiatus. Sometimes, life just gets in the way. I find it a Herculean task to gather some quiet time for creative writing in our 2-bedroom apartment filled with a husband, 2 grown man-children, 2 cats and an endless selection of stuff that magically roams from its proper storage space to the couch, on to the dinner table and that one corner of the house where “it” will live for the next 3 months, before continuing its orbit to the ottoman… until such time I get tired of the mess and return “it” to its proper storage space… or – more often than not – vocalize my annoyance to the troops and demand order… PRONTO!  I have ideas that fill my head space, you know. They collect in that tiny little brain cavity next to the “What  am I cooking for dinner?” box and the “Oye. I need to do laundry!” bin of random thoughts. In order to materialize these thoughts onto proverbial paper, one needs time… or an alternate reality, whichever comes first. [note to the creator of said alternate reality: please give me curly hair and make me a size 8. Full stop.]

This concludes my paragraph on why I haven’t written on my blog. Also referred to as the ‘whiny paragraph’…

Recently, the man-children started their first full-time job. While this is certainly cause for celebration, it also brings another conundrum: housework is automatically deferred to yours truly, cause you now they are busy and tired… Pardon me while I take a deep, prolonged breath, y’all… I could launch into another darker paragraph, but I truly do love my men and I shall bear my cross passively until my next melt-down.

Yesterday was one of those days. I needed something quick, cheap and packed with flavor. I find that Asian stir-fry’s nearly always deliver on this trifecta that is every working servant-less (wo)man’s dream. (One has to be careful with assigning gender-rolls lately. Insert sarcasm here.) A wok helps, but you don’t need it and I find that I can easily adapt recipes to fit my cast-iron skillet or low Dutch oven. I know it’s not authentic. I know it’s not how it’s supposed to be. Please don’t email me. Please?

A long, long time ago… when I was single and traveling  from the kitchen to the hamper  the world… My friend & I backpacked Thailand. Drenched, tired from hopping tuk-tuk’s all day and starving, we quickly ran into this obscure little restaurant with faded turquoise walls, an Elvis poster and a coca-cola vending machine. The sky had opened and unleased a torrential downpour on us. The metal bistro table & chairs stuck to our clammy skin, but it felt good to get some relief from the excessive heat. Reading the menu was as adventures as our travel plans were. I had no idea what “Gai Pad Med Ma Muang” was, but I tell you, that cashew chicken was heaven on a plate.
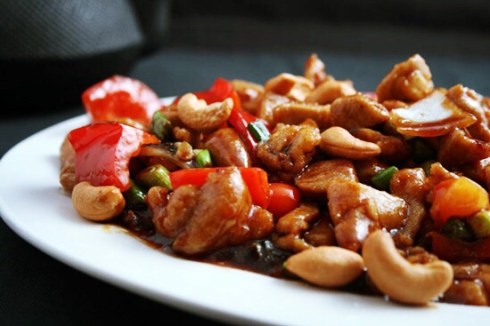
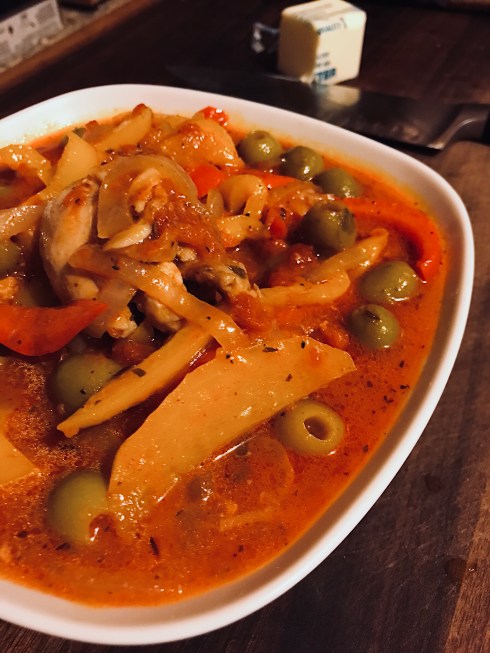


CASHEW CHICKEN

For the chicken mixture:

– 1.5 lbs of boneless skinless chicken thighs, cut into bite-size pieces

– 0.5 cup of cassava flour or regular flour

– 1 red bell pepper, sliced into thin strips (julienned)

– 1 yellow bell pepper, sliced into thin strips (julienned)

– 1 medium-sized onion, sliced into thin strips *julienned)

– 1 cup of raw, unsalted cashew nuts

– 5 green onions, green parts sliced into chunks on the diagonal

– 1-2 cloves of garlic, minced or grated

– 1-2 dry red Thai chilies, thinly sliced (julienned)   *** if you do not like heat, leave these out  ***

– 1 cup of peanut oil (you can use any oil you like, but make sure it has a high heat tolerance)

Toss chicken pieces into the flour and coat each piece thoroughly, shaking off the excess.

In a wide heavy pan, add peanut oil and bring the oil & pan to high heat, over medium heat. You don’t want to burn the oil, you just want to give your pan enough time to get really hot. REALLY, ok? This a long-sleeves type dish, people.

Toss cashew nuts into the pan and fry in the hot oil for a couple of minutes until golden. Set aside on paper towels. Repeat with the Thai red chilies, if using, and set chilies aside when crisp and bright red.

Leave oil in the pan and fry chicken pieces until golden brown on all sides. Remove from the pan and set aside.

Pour off any excess peanut oil, but leave about 2 tbsp behind.

Throw all of the bell pepper slices and onion into pan, together with the minced garlic and ginger. Stir and sauté until the peppers are soft and onions translucent.

Add chicken pieces, cashews & Thai chilies back into pan and add a ladle (0.5 cup?) of the sauce below. You will not need all of the sauce, just add enough sauce to cover everything until you reach sauce-level you like.

Add green onions and sauté another minute or so.

Lastly turn off the heat and sprinkle green onions over the dish. Serve hot over a bowl of rice.

For the sauce (this makes a lot of sauce and you can some for later)

– 0.50 cup light soy sauce

– 0.25 cup dark soy sauce

– 0.25 oyster sauce

– 0.50 cup of chicken stock (or water)

– 1 tbsp of brown sugar

– salt, pepper to taste

– 1 clove of minced garlic

– 1 inch piece of fresh ginger, grated

Combine all ingredients and whisk. Set aside.

I usually do this in a large mason jar and give a good shake. Whisking is so overrated. Also, I can then place the jar in my fridge for another stir-fry later on. I find that it generally keeps fresh in the fridge for 7-10 days.

Lemon Curd

13 Mar

Lemon curd.

It’s not exactly an attractive sounding name, is it? Who reads that and goes “oh yum, I must have some C.U.R.D…!”. Unless you’re British and scones make up 70% of your daily dietary intake, I don’t think anyone gets super-hyped over curd. It just doesn’t excite like Javier Bardem chocolate does, does it?

Nonetheless, lemon curd has been on my list of “things to give a go” for a while now. I love lemon flavored things, but I never really grasped the vast deliciousness of curd until I made it last Sunday morning. Somehow, I always thought of making curd as a complicated ‘fancy’ thing. And somehow, I always thought the effort wasn’t worth it. I couldn’t have hit further off the mark if I was a 10-yr old boy in a public urinal. I was so wrong. Wrong-er than Richard Simmons’ aerobic outfits, and that is a whole other dimension of wrong, folks!

It all started with a trip to Underwood Family Farms with my fiery Latina colleague Maritza. If you’re in the greater Los Angeles area, you must visit some time. If you don’t have a fiery Latina colleague named Maritza, bring your kids to achieve the same level of vivaciousness & spunk. Being a full-fledged operational farm, complete with muddied farm workers & equipment that looks like it could be featured in a Halloween horror movie. The farm has brilliantly married its day-to-day operations with modern society’s obsession with Instagram, selfie-taking and a reconnect with Mother Earth. Opening a portion of their farm to the public, the owners’ genius created a farm fun-land for city slickers like yours truly. Beside a petting zoo, a playground, farm-themed kids’ entertainment and a fairly large farm stand for those who do not ‘dirt & sweat’ well, you also have endless…endless!… fields of U-pick deliciousness which rotate with the seasons. They are, after all, a real farm. Not a Disneyland farm.

Forget the quality of the produce for a minute… If you’ve already swan-dived into farm-fresh produce, carry on. For all others, sit down next to me and read on: picking your own produce is fun & therapeutic.  I never knew that snapping broccoli off its mother-stem had addictive qualities. The very moment you know it’s going to snap off, is incredibly satisfying. Or the wet, almost muted swooshing sound a beet makes as its roots leave the ground… Not to mention the suspense of not knowing how large that sucker is going to be? Right?  Then there’s the incredible aroma that fills the air when you yank a bunch of fresh cilantro out of the dirt. I have no words for that. Or, the delicateness with which you carefully harvest raspberries, making sure you’re as gentle with them as you are with your grandmother’s porcelain. Or cupping a handful of blueberries and watching them happily dart into your basket as they release… And, last but not least, the heroic courage you find within yourself to boldly reach into a cobwebbed cluster of branches to pick the ‘perfect’ lemon, only to then frantically fling your hand a Mach 3 speed to ensure all you got was the lemon… I find it all extraordinarily relaxing and rewarding.

And then there’s the flavor… It’s the stuff of fairytales. The thing is, one day you’re eating the flavorless fruits and produce you’ve always liked and you wouldn’t change a single thing. And then, one day, the triple-threat crunch/sweet/juicy punch of a fresh vegetable gets under your skin and suddenly, the grocery store landscape is a bleak, depressing place without these fresh beauties.

Dirty, sweaty and tired – I came home with the mother-ship of Meyer lemons. Funny enough, curd wasn’t even on my mind at the time. I figured that with the Farklepants’ brothers battling a nasty head cold, I would just juice them (the lemons, not the brothers) with some ginger… but then Bobby Flay ate a scone with lemon curd on Sunday morning. All bets were off.

The recipe below makes approx. 2 cups. You’re going to want to eat this sweet tangyness straight out of the jar, so I suggest you get your spoon ready.

IMG_1374

LEMON CURD

(per a recipe form Life Currents)

– 0.5 cup of Meyer lemon juice (or regular lemon juice)

– 1 stick of butter (4 oz), cubed

– 0.5 cups of granulated sugar (add an extra tablespoon if using regular lemon juice)

– 1/4 teaspoon of salt, or ‘a pinch’

– 4 large egg yolks + 3 whole large eggs  (use 3+3 for extra large eggs)

In small saucepan, combine the lemon juice, sugar, butter & salt. Heat over low heat until the butter has melted and the sugar has dissolved.

In a medium size bowl, whisk 4 egg yolks and 3 whole eggs together until well-combined.

Here’s the tricky part: gently & slowly incorporate half of the hot lemon/butter mixture into your eggs, all the while whisking. This is called ‘tempering’ your eggs and forming an emulsion, so you don’t end up with scrambled eggs.

Place the bowl with the tempered egg mixture over a gently simmering pot of water (au bain marie) and incorporate the remainder of the lemon/butter mixture until it thickens. The thickening starts around 150F and will have the right consistency around 180F. If you don’t have a candy thermometer, just look for the consistency of custard. It will take approx. 5 min of constant gentle whisking (do not stop whisking, or you’ll end up with scrambled eggs!)

Also make sure to NOT boil the mixture.

Run the custard through a mesh sieve to get rid of any potential egg bits, and place the curd into a jar. Chill for at least 3 hours in the fridge.

Brazilian Shrimp & Crab Stew

19 Sep

Earlier this morning, my friend Debi over at Life Currents posted a recipe for Shrimp & Crab Enchiladas. She & her husband ‘Dan-the-Man’ apparently roam in delicious circles, as their fabulous friend Chad whipped up those incredibly delicious-looking enchiladas. Chad, you’re the man too! 

Since I wasn’t properly fed or caffeinated yet, what with having skipped breakfast and all, the thought of succulent shrimp & crab flirted with me like a fierce Russian mail order bride until well after noon. By the time I got off work, I knew I wanted shrimp & crab, but we had just feasted on Mexican food yesterday so I was contemplating what to make with it. Then, as by divine intervention, I drove past a Brazilian Ju-Jitsu place on my way to the grocery store, et voila I know! Isn’t the brain a wonderful thing?! 

The dish below is actually called “Moqueca”. A quick Pinterest study taught Me that there are about as many versions of “Moqueca” available as there are Brazilian grandma’s, but I read a few recipes and ran with it. I’m by no means proclaiming the dish below is authentic, but it tastes like a sultry day salsa dance on Ipanema Beach, steel drums & all. Perfect for a Monday eve, if you ask me.  

Serve it over rice or -like yours truly- with a big honk of crusty bread to sop up all the juices. 

BRAZILIAN SHRIMP & CRAB STEW
(Based on a handful of Pinterest recipes for “Moqueca de Camaroes”)

– 2x 16oz bags of fresh or frozen large shrimp, peeled & deveined, tail off
– 32oz of fresh crab meat, or 2x 16oz of canned premium crab meat (claw)
– 2x 12oz jars of roasted red peppers, drained & cut into strips
– 2 yellow bell peppers, cut into strips
– 2 large onions, finely diced/chopped
– 3-4 fresh limes
– 6 cloves of garlic, grated 
– 4oz of tomato paste
– 2 Tbsp of turmeric
– 2 Tbsp of ground cumin
– 2 Tbsp of fresh ginger, grated
– 1-2 tsp of Sriracha (or harissa, sambal oelek or a similar hot sauce of your choice)
– 2x 15oz cans of coconut milk
– salt & pepper 

In a large container, toss shrimp with ground cumin, 2 grated cloves of garlic and juice of 2 limes. Set aside for 30 min.

In a large heavy pot, add onions & yellow peppers in a bit of oil, season with salt & pepper, and sauté over medium-high heat until vegetables begin to soften. 

Turn heat to medium and add turmeric, tomato paste & fresh ginger to the onions & peppers. Stir to coat and cook for 1-2 minutes to release the flavors

Add diced tomatoes, coconut milk, garlic and juice of remaining 1-2 limes, and bring to a simmer. Simmer until vegetables are soft and sauce begins to thicken somewhat.

Add Sriracha and season with salt & pepper to your liking. 

Add shrimp and all their juices to the simmering vegetable mixture, and cook 15-20 min until shrimp are cooked through. Add crab meat and warm through over low heat. 

Add chopped cilantro & parsley, and serve immediately. 

Haldi Ka Doodh (Golden Milk)

2 Sep

The other day, my workoholic beau private messaged me on Facebook with: “I’d like to try golden milk. I haven’t looked up the recipe online, but it’s supposed to be good for you and give you energy”. At first, I figured his carnivorous self couldn’t possibly have come up with this himself, which instantly made me think that surely he heard it from that cute little barista at his nearby Starbucks. However, since I’m not entirely “Sybil”-like, I quickly suppressed my recessive jealous gene by channeling my non-PMS’ing brain cells, and explained his request as someone who wants to get healthier… and possibly be around me for a long time to come. I’m blessed.

So.. challenge accepted, mister. Turns out, golden milk is a staple in Ayurvedic medicine. It’s official name, Haldi ka Doodh, calls for milk to be warmed and steeped with fresh turmeric, fresh ginger and a pinch of black pepper, the latter reportedly boasting your body’s ability to digest turmeric by 2000%. TWO THOUSAND! Whoa. There are a ton of variations available online. As a matter of fact, while I slept comfortably under my rock, it seems ‘golden milk’ rose to frenzied fame on the wellness web. I mean, Gwyneth Paltrow swears by it. Do I need to say more? DO I?!

The star players in the various renditions you can find online are always a milky foundation and yellow turmeric. You are free to milk your own cow or goat, but many seem to use coconut milk or almond milk. Since dairy tends to not always agree with the mister, I used coconut milk. Some recipes call for tablespoons versus teaspoons, some tell you to bring the mixture to a boil whereas others warn you not to let the mixture boil to avoid losing the natural benefits of its ingredients. Some creatively hint towards a blend of mulling spices, a good number of them have discrepancies in cup measurements and there is a wild debate between fresh turmeric & fresh ginger versus their powdered cousins. Add in the sheer schizophrenia in its namesake (turmeric tea, turmeric latte, golden milk, golden latte, Haldi ka Doodh…) and you’ve got a recipe that is more confused than a gender-fluid teenager. 

Firstly, let’s talk turmeric… This ‘spice-du-jour’ is what gives your milky concoction its golden hue. Be forewarned, in its fresh root or ‘paste’-variety, it’s an instant dye for your milk, cutting board or whatever new item of clothing you happen to be wearing. Turmeric’s health benefits come from its plant compound named ‘curcumin’ (“kurkuma” in Dutch, because my Flemish-speaking mom will surely ask me what the heck turmeric is. You’re welcome, mom!). Reportedly, curcumin boasts a wide range of digestive, respiratory and… boom chika chika wow wow… reproductive-health improvements. It’s reportedly also good to prevent cancer and seems to aide liver function. Disclaimer: none of these health benefits are actually backed by scientific research, but then again, free natural stuff impedes on a pharmaceutical exec’s vacation on Bora Bora. I’d say, check it out for yourself and see if you feel better. At the very least, you will have discovered a delicious new drink.

Personally, turmeric & I have long been embroiled in a hot affair, as almost all Indian spice blends include turmeric and typically give curry its yellow color as well. Since Scott & I have a thing with warm Indian flavorings, I figured golden milk could very well be good for you and tasty at the same time. I ventured out to Whole Foods, purveyor of all things extraordinary expensive natural & organic, but wasn’t able to find fresh turmeric. I settled on dried, ground spices instead. I used coconut milk from the dairy aisle and added in a small can of coconut cream, because I like things creamy.

Pouring everything into a big cast iron pot and letting the mixture warm through, the aroma grabbed me by the nose almost right away. It’s earthy and so warmly spiced, it’s truly a cozy cup of Fall deliciousness. I haven’t tried drinking it cold, but it was very tasty whilst hot and I can assure you I’ll be making overnight oats with this concoction… If you don’t like Indian food, this is likely not going to be your cup of tea. However, if you’re like us and you like warm spices, then this will surely become one of your favorites too.


HALDI KA DOODH (GOLDEN MILK)
(A pleasant Americanized good-for-you beverage)

– 8 cups of coconut milk (or almond milk, soy milk, cow’s milk or any other kind of milk)
– 6 oz of coconut cream (optional) (*)
– 3 Tbsp ground turmeric
– 2 Tbsp ground cinnamon
– 2 Tbsp ground ginger
– 0.5 tsp ground cardamom
– 3 Tbsp of honey (or a sweetener of your choice)
– 4 cloves
– a splash of hot water
– a pinch of saffron (optional, garnish)
– a pinch of black pepper (**)
(*) fat aides in the absorption of curcumin, if not using cream, make a spice paste with a bit of coconut oil instead of water. You can also use regular dairy whipping cream.
(**) black pepper boasts your body’s ability to absorb the beneficial curcumin (Turmeric) by an impressive 2000%.

In a small bowl, mix all ground spices (except saffron & pepper) and make a paste with a splash of hot water. Set aside.

In a heavy pot (I used a cast iron Dutch oven), combine milk with cream, spice paste, and cloves. Bring to a gentle simmer, not a rolling boil, until frothy. Turn heat off and let steep for an additional 15-20 min and add a pinch of black pepper. Strain mixture to remove cloves.

Finnish with honey (for sweetness) and a pinch of saffron. Serve hot or cold.

Recipe above makes approx. 8-9 cups

Pita Crisps

25 Sep

Somewhere en-route between Ralph’s and home yesterday, I suffered a massive brain injury. It became evident when I plopped down all those grocery bags on our kitchen counter and, halfway through unpacking, devoured a 1,713 calorie bag of pita chips in 0.46 seconds flat. I confess I may also have eaten 3 large spoonful’s of Nutella. I plead the fifth. Seriously, I’m blaming it entirely on acute onset PMS. If Mother Nature was a person, I’d invite her over for British tea and explain that this type of physiological shenanigans won’t do…. and then I’d punch her. (And possibly cry)

My descend into the pit of mindless eating wasn’t so much disturbing because I wolfed that bag down in record time, but more so because that was a family-size bag that cost me $5.95. We won’t even mention all that hummus & baba ghanoush that is now forced to live on in my fridge without any real purpose. ** insert a moment of silence. **

Just as I tossed the empty bag into the trash and started to feel partially guilty, Ina Garten popped up on TV, as by Divine Intervention. Complete with overly starched blouse and that trademark “I live in the Hamptons and you don’t” smile. She and her trusted bob-hairdo were entertaining a fellow Hamptonian, and she whipped up a platter of Greek deliciousness accompanied by house-baked pita chips. How easy is that? Of course, I don’t have access to artisan stone-milled wheat to handcraft my own pita bread, but she assured me store-bought is fine.

At an average cost of $0.99-$2.00 for a package of 6 pita bread rounds, home-baked pita chips are the fraction of the cost of those from Stacy’s popular brands. They are super easy to make, don’t require a lot of time-commitment and I think this could be a fun kid project too because, let’s face it, who doesn’t relish the idea of their 6-year old playing with a brush and olive oil?!

Once baked & cooled, I typically keep them in a Ziplock bag in our breadbasket for a few weeks, although they usually don’t last that long. You can sprinkle them with sea salt & herbs, or season them up with cinnamon sugar, or even cheese popcorn sprinkle… The choice truly is yours.

PITA CHIPS
(Courtesy of Ms. Garten & her bob hairdo… and a touch of Hungry Belgian)

– 6 pita bread rounds, or however many you want to bake
– olive oil
– seasonings of your choice

Preheat oven to 350F.

Cut pita bread rounds in half, and cut each half in half again.

Take each quarter, and cut it in half again, so you end up with small pita bread triangles.

Brush each triangle lightly with olive oil front & back, and place in a single layer on a baking sheet.

Sprinkle with sea salt, or any savory seasoning of your choice. (on one side only is fine). For sweet crisps, bake without seasoning and toss in cinnamon sugar after the baking process, when the chips are partially cooled but still a tad warm.

Bake for approx. 10-15 min on 1 side, then flip each triangle and bake for an additional 5 minutes on the other side. Keep an eye on them, as they can burn quickly. You want them to be crisp and golden on both sides.

Let cool completely, then store in an airtight container or ziplock bag, in a cool dry place.

Mediterranean Chicken with Garlicky Yogurt Sauce

3 Aug

Raise your hand if you loathe moving?

Yeah
. Moving is no pool party. Last 18th June 2015, my elusive landlord of 6 years decided to not renew our apartment lease. Our 2-bedroom/1.5 bathroom sits in a prime beach location and our abode is in high demand, what with rental prices sky-rocketing in Los Angeles. He’s long been wanting to gut & remodel the place, so he can double the rent. I saw it happening to multiple neighbors, heard their stories about how awful he is, but being the longest-standing tenant in the complex with a stellar reputation in paying rent and no unpleasantness with him, I guess I was incredulous that he’d get rid of us as well… Boy, was I wrong. You would think that after having been a conscientious tenant for 6 years, the old fart would pick up the phone and call me to break the news, but instead Dr. Parviz Parsa chose the Ayurvedic non-confrontational approach and taped a 60-day move-out notice to our front door. I suppose that actually speaking with us, would have upset his 87-year old chakras?!

Because I’m Belgian, and because I’m a professional event planner extraordinaire, we were packed and moved by 01st July, precisely 13 days post beachside apocalypse. Sans dope, Lance Armstrong! Truthfully, given the timeline between the quaint “let’s tape this to the door and surprise them” move-out notice and our actually physical move, we emotionally crashed & burned upon arrival in our new home. Oh, and did I mention we continued working full-time during those 13 days of packing and moving? Gives it a whole new dimension, doesn’t it? DOESN’T IT? 

We’ve mostly been living off of pizza, pasta, hamburgers and ‘mystery meals’ at the various Vietnamese and Korean eateries in our new hood. With most of our boxes unpacked, we’re finally starting to feel less… well… shall we say feral? The cats, too, are slowly adjusting to “life beyond the closet”, and it seems the dust is finally settling. Literally

With the kitchen fully unpacked, I no longer have any excuse to not cook a decent meal. So yesterday, I reverted back to our loyal friend: the boneless, skinless chicken thigh or breast. Who doesn’t love a juicy thigh?

The chicken recipe below is very much a take on Mediterranean or Middle-Eastern cuisine. You can grill the chicken thighs, or skewer them and then grill them, but since apartment living doesn’t allow for open flame BBQ’s, I simply roasted them in the oven in a heavy cast iron pan. I’m lucky to own a variety of Lodge pans, and my 15-inch one is never far out of reach…


MEDITERRANEAN CHICKEN WITH GARLICKY YOGURT SAUCE

(a delicious Hungry Belgian medley of various Pinterest recipes)

For the chicken:

– 12-15 boneless, skinless chicken thighs, rinsed and patted dry (or 5-6 breasts, halved)

– 5 Tbsp of sweet Hungarian paprika

– 5 Tbsp of ground cumin

– 2 Tbsp of cinnamon

– 4-5 large garlic cloves, crushed or grated

– 1/2 cup of finely chopped parsley

– juice of 1 fresh lime (or 1/2 lemon)

– salt & pepper

– olive oil, for searing

Toss all the spices together and blend with the pressed garlic & lime juice. Coat the raw, rinsed chicken in the spice paste, toss with the chopped parsley and marinate in the fridge for at least 2 hours. Take out of the fridge, and let rest for another 10-15 minutes.

Preheat oven to 425F.

In a heavy oven-proof pan, heat a couple of tablespoons of oil and let the pan get hot. The oil will shimmer, and it will be hot enough when it starts smoking lightly. Quickly sear thighs on all sides, then place the pan in the pre-heated oven and roast the chicken until tender… Approx. 20-30 min depending on how large the thighs are. Your house will smell delicious.

For the garlic sauce:

– 1/2 cup of yogurt cheese (eg. Karoun-brand Labne) or thick, full fat Greek yogurt

– 1/2 cup of sour cream

– 3 large garlic cloves, crushed or grated

– 1/4 cup of finely minced chives

– 1/4 cup of finely chopped parsley

– juice of 1 lime or half a lemon.

– salt & pepper

Stir everything together and let sit in the fridge for a few hours so the flavors can blend. Spoon cold over your hot roasted chicken. Yum!

I served the above with plain sautéed zucchini, but you can certainly roast a blend of veggies or grill them on the BBQ too. The possibilities are endless here…

PS: this dish got snarfled down in record time, so forgive the poor picture quality of the raw chicken cooking in the pan! 

Farmers Insurance: The story of Farklepants vs. Goliath.

9 Mar

Pardon my departure from the food trail. I’m mad. Damned mad. I’ll apologize in advance if my rant offends. If your son or daughter, sister or brother, or loved one works for Farmers, I’m sure they’re good people working an honest job. As a corporation, though, Farmers Insurance knocked me down like a bully. And they know it.


Jan 2014 “Marlboro Man” rear-ended me. At the time of the crash, he stated he was grabbing a pack of cigarettes off of the floor of his pick-up truck, did not see my big 2007 Honda CR-V in front of him and… BOOM! At least Marlboro Man was nice was about it.  He seemed genuinely concerned about the aftermath his stupidity lapse of judgment caused, and I appreciated that. The fact that he turned beet-red and was shaking like a leaf when both myself and the 3rd driver suggested we get police involved, actually made us calm him down. Poor guy.


Sadly, Farmers Insurance wasn’t so nice about it. Truthfully, their agents were downright rude & demeaning to me, the middle car, and almost made me feel like I belonged to a rival gang speaking with them. The fact that I was actually the victim in this equation was of no importance to them. Their primary objective was not my well-being, but rather damage-control. An insatiable need to deny my injury, so they could justify in their corporate minds that their settlement offer was ‘generous’, and that I should fall on my knees for even being offered a settlement at all… a statement one of their agents made during one of our phone calls. That set the tone, now didn’t it?! 

From the get-go, Farmers Insurance’s agents adopted the belief that I was somehow partially responsible for this accident. Dana R. actually went as far as to say out loud – over the phone, of course, never in writing – that I had a “…shared liability…” in this crash. When asked what that liability may be, she spared no vocabulary in telling me precisely how she ‘knew’ I could have not suffered a whiplash injury and that it was clear to her I had over-treated myself. Knew?! She coldly & robotically proceeded that I “…should have never gone to the ER…” since my “… so-called injury…” didn’t require it. Why, thank you Dana. With your medical expertise and your creative interpretation of the X-ray of my damaged neck and my nearly 3K in medical bills I submitted with my claim, I’m sure you’re an asset to the Farmers’ group. 


Sadly, my story is but a droplet on a hot plate. There are hundreds before me whom have been treated this way by Farmers Insurance, and there are dozens of Internet chat boards and sites dedicated to Farmers’ culture of deliberately low-balling people whom have relatively small claims. I spoke with the California Insurance Commission and several attorneys, and their stories all have one common denominator: nobody really enforces the ‘Bad Faith’ law. Low-balling fraud is rampant because there is no enforcement, and attorneys do not engage with low-impact accidents since these cases typically do not yield enough earnings to justify their efforts and court filing fees. It’s the perfect breeding ground for “legal” corruption. Despite strong ties to shared friendships, not a single attorney wanted to take on my case. The advice I received was to track down the driver’s address and file a case in small claims court. “You’ll win, hands down!”, they said. “It’s like Judge Judy on TV, no biggie!”. And just like that, me & my injured neck got tangled in a cobweb of immorality and greed. I can either struggle and get tangled even deeper with a court case and no legal representation, or I can choose to release and settle for pennies on the dollar of my medical bills. 


So what’s a gal to do? Track down Marlboro Man in typical “Bounty Hunter”-style so I can serve him with court papers? Dip into my pocket even deeper so I can pay the court filing fees for a case that should have never even gone to court? It’s all incredibly unfair and immoral, and all because Farmers Insurance knows they get away with this kind of practice over and over again… it’s like a spider lurking in its web to see who has the audacity to intrude. 


What hurts the most in this, is that small business farmers are actually close to my heart. They’re the salt of the earth kind of people, hard-working with integrity and morality. It’s a down right travesty that this insurance company uses farmers’ image to market themselves as a wholesome company. There is no morality or integrity to be had with Farmers Insurance, at least not in my dealings with them. If I was a farmer, I’d be angry and ashamed.


None of my family will ever be Farmers Insurance customers. A pact we are committed to every time I stretch my neck and swallow an Advil.