Sour Cream Mashed Sweet Potatoes

28 Feb

Wow. It’s been 56 days since my last blog post. 


While my mother is probably already muttering under her breath that I’m  not finishing what I have started (is there ever such a thing as finishing a blog, though?!), I think that for once it’s safe to say she has a point. 56 days is entirely too long and I have no excuse for blowing the ‘Blogger of the Year’ award straight out of the water like that, but whatever. I’m not writing this blog to stroke my ego with awards and admiration. Wait! What? Who am I kidding?! I’m totally writing this blog for unconditional admiration from total strangers. Don’t judge.


The thing is, I feel like I’m not cooking anything blog-worthy nowadays. All we can really afford is chicken, and all those plump rosy thighs & breasts spiraled me straight down into writer’s block. I betcha that never happens to the writers of Hustler Magazine. It’s an unfair world, y’all?! In typical Teutonic fashion, I think I just set my own blogging bar entirely too high. I’ve always aspired to be an over-achiever, which has once driven me to attempt 78 sit-ups in 60 secs and resulted in a pulled muscle, but we digress…


Yesterday, my newfound love for sweet potatoes broke me loose from my self-imposed writing chain. I’ll admit I was skeptical at first since I’ve had a long-standing passive-aggressive relationship with sweet potatoes. I generally hate them. Then I get into a health kick and buy them anyway, only to not cook them out of fear of disappointment and – upon realization that decay is setting in and I’m wasting $5-$10 worth of food – I get angry at their underachievement in freshness and it cultivates my ice-cold disdain for them even more. No wiiiirrre hangers!!!! Shudder.

But yesterday was different. It all started a few months ago when my friend Laura invited me over to her house for a dinner party with an old colleague of ours. We did some wine drinking, and then sum mor wein trink’n, and then we kissed Francis Coppola and then Laura cooked the most amazing ‘Five Spice Tilapia’ and served it alongside a baked sweet potato, loaded with nuts & yogurt and stuff. The tanginess of the yogurt was perfect with the sweetness of that potato, and in combination with the saltiness of that delicious Tilapia… I swear, I nearly peed myself from culinary excitement. If only Liberace would have understood subtle balance like that!


Laura’s yam made me re-think the whole idea of sweet potatoes. No more cloyingly sweet casseroles or sugary mashes. And puh-lease, hold the damn marshmallows! The mash below is mildly sweet, but it’s the tanginess of that sour cream that steps it up and shows that yam who’s boss. I’m totally team sour cream.


SOUR CREAM MASHED SWEET POTATOES

(Recipe courtesy: “The Madison Inn”, Ascheville NC)

– 1 dozen large red sweet potatoes or yams (or both), peeled and sliced in chunks

– 8 cups of chicken stock

– 1 cup sour cream

– 1/4  cup light brown sugar 

– 1/4 cup of maple syrup 

– 1/4 cup whipping cream

– 4 Tbsp of butter


In a large pot, combine sweet potato chunks and chicken stock, and bring to a boil. Simmer until potatoes are tender and easily mashable. I mashed my potatoes by hand, but you can also use a mixer. I like my mashed potatoes a bit chunky still. 


In the meantime, melt 4 Tbsp of butter and stir into the cold whipping cream. Pour over cooked mashed sweet potatoes and blend well. Fold in sour cream & brown sugar, and season with salt & pepper to taste. If you like your mashed potatoes sweeter, add some more maple syrup or sugar. (I omitted the maple syrup altogether, and the mash was just the right amount of sweetness to me)

Tangy Honey-Mustard Dressing

2 Jan

2nd January 2015: The crossroads of ‘…ooooh, I mustn’t…’ and ‘…aargh, F#@& it!, I’m gonna eat it…’. If you’re here, right in the epicenter of that diet conundrum, divert your eyes and stop reading now.

Raise your hand if you’ve ever felt all proud and accomplished for having chopped up a wickedly healthy salad… only to then slather it in 500 calories worth of dressing, with buttery croutons to boot. You’re not alone! If it weren’t for the tang of dressing, I probably wouldn’t be all gung-ho about salad either. As a matter of fact, the creamier the dressing, the easier I find it to eat raw leafy greens, after all, I’m not a goat. Frankly, anyone who proclaims to enjoy salad without dressing is a shameless liar; a Spartan… or a farm animal reincarnate. I’m not above Buddhist philosophies, y’all.
In the face of whimsical diets that promote things like ‘light’ raspberry vinaigrette, creamy honey-mustard dressing may very well be the Beowulf of all salad condiments. In our fridge, however, its beguiling golden hue shines like the Holy Grail…

The other day, I bought a Costco-sized tub of sour cream. I don’t even know how many ounces is in that cradle of tangy deliciousness, but at $3.79 it was practically the same price as a much smaller tub you’d buy at the regular grocery store and that’s all the convincing I needed to heave that sucker into my cargo ship cart. I’m not sure what I was thinking, but it’s safe to assume that my mind wasn’t on any New Year’s resolutions.

With a tangy sour cream base, the dressing below can be spooned straight out of the jar drizzled over salad, but should you feel rebellious, you can use steamed artichoke leaves as a vessel to bring this deliciousness into your gaping mouth as well.

/home/wpcom/public_html/wp-content/blogs.dir/325/54748132/files/2015/01/img_1173-0.jpg

TANGY HONEY-MUSTARD DRESSING
(Per various Pinterest finds…)
– 1 ½ cups of sour cream (or Greek yogurt, for a ‘lighter’ version)
– ½ cup of mayo
– juice of 2 fresh lemons
– 1 large garlic clove, crushed
– 4 heaping Tbsp of yellow mustard
– 6 Tbsp of honey (or agave syrup)
– salt & pepper, to taste

Add all the ingredients to a large quart-size canning jar, and give it a good shake…

General Tsao’s Chicken

7 Sep

Who is this General Tsao and did he own a cast iron skillet?! A quick Wikipedia search tells me that while the Hunan province man existed, it appears the Qing Dynasty general actually had little or no connection to the sweet & sour deliciousness named after him. It remains a mystery if he owned a cast iron skillet, but with cast iron being a Chinese invention from the 5th Century BC, I’m thinking “yes”.

I confess that I’ve never been a big fan of Chinese take-out. Not because I think the fate of all feral dogs & cats has anything to do with it, even though my mom would argue the mathematical uncertainty of this, but rather because it lacks bacon it tends to be so syrupy sweet. A factor that directly contributes to the Farklepants’ stepkids’ burning love for Chinese take-out.

Fueled by cocky contempt for cheap take-out, I figured that whatever Panda Express can do, I can do better. There’s no shortage of recipes online, so I blended the best of all and added Sriracha my own touch to please my palate. And since I’m preoccupied with the health of my family, I also added a good amount of veggies, because, you know, I’m an evil person “green” is a color my adopted brood’s diet is challenged by.

Feel free to substitute the bell peppers and/or sugar snap peas with any other vegetable(s) you like… or leave them out altogether and garner a deep respect from the entire male juvenile population in the USA. On that note, you can use this sauce on pretty much anything you want to give an Asian flavor, grill with it, marinate with it or simply suck it with a straw.

IMG_2405.JPG

GENERAL TSAO’S CHICKEN
(Loosely based on a vast collection of Pinterest recipes)
For the sauce:
– 1/2 cup of chicken stock
– 2 Tbsp of soy sauce
– 2 Tbsp of rice vinegar
– 4 Tbsp of Hoisin sauce (*)
– 4 tsp of Sriracha sauce (this dish is pretty spicy. Add less for moderate or mild heat)
– 4 tsp of sesame oil
– 5 Tbsp of honey or sugar
(*) You can find Hoisin sauce in the Asian section of your supermarket. Kikkoman is the brand I used and the most commonly sold.

For the stirfry:
– 3-4 boneless, skinless chicken breasts
– 1/2 cup of corn meal (*)
– 1/2 of all-purpose flour
– 1 large red bell pepper, chopped into strips
– 2 good handfuls of sugar snap peas or snow peas
– 2 bunches of scallions, chopped
– 6 garlic cloves, minced
– 3 tsp of fresh ginger, grated (approx. 3-inch piece)
– peanut oil or lard for frying the chicken cubes
(*) You can also just use flour if you can’t find corn meal. I find that a flour/corn meal mixture gives extra crunch, but it’s not a “must”.

Combine all the sauce ingredients in a jar and give it a good shake. You should have about 1.5 cups worth, but a bit more or less is not a problem.

Slice all veggies and set aside. Grate garlic and ginger, and set aside.

Rinse & dry chicken breast completely. Slice chicken into bite-size pieces, approx. the size of a walnut. Salt & pepper the chicken pieces.
Combine corn meal & flour, and coat chicken pieces liberally. Make sure all pieces are bone-dry, as otherwise they won’t brown properly.

In a cast iron skillet or heavy pot, heat peanut oil (or lard) to 350F and fry the chicken pieces until they are golden brown and crisp. You only need to go about 1/2 inch deep with oil, and for me, that was about 1 cup of lard in my 12-inch cast iron skillet.
I fried my chicken in 3 batches. Each batch only takes a few minutes, so it went pretty quickly. They should be slightly crunchy on the outside. They may not be cooked entirely trough at this stage, but don’t worry, as they’ll cook through later on when we combine everything.

Take fried chicken pieces out of the pan, and set on a paper towel lined plate to absorb some of the excess fat.

Drain all but 1-2 Tbsp of the fat, place hot pan back over medium heat and add all of the bell pepper & sugar snap peas and sauté for a few minutes until ‘just’ beginning to soften. I like the crunchy texture of slightly under-cooked vegetables, but you can sauté them all the way to “done” if this is your preference.

Add grated garlic & ginger, half of the scallions & chicken pieces back into the pan, and pour sauce over the top. Simmer over medium-low heat until sauce reduces, thickens & coats chicken evenly. This only takes about 10-15 min or so.

When ready, add remaining scallions and serve hot over steamed white or brown rice.

Cottage Pie with Root Vegetables

28 Aug

In exactly 44 days, my mom will land at Los Angeles Int’l airport. It’s an event the Farklepants’ household is already mentally preparing for, if nothing else, than to cross off the days on our kitchen calendar to see precisely how much more time we have left to bring the cleanliness & organization of our apartment up to military Cecilia’s standards.

It’s no easy feat. My mother, bless her heart, is a densely woven tapestry of arduous self-imposed rules & regulations, enforced daily by a deep, unrelenting desire for order & control. Flying by the seat of your pants, which is pretty much the mantra in our house, is something my elderly mom has a hard time coping with. She unwittingly, and with the best of intentions, attempts to smash & stuff our souls into her daily mold of how things ought to be, and at times this collides with the chaotic habits of my free-thinking creative family. She also takes planning and organization to uncharted heights. You know, the kind of heights Martha Stewart can only dream of reaching with her hand-carved & antiquated Scandinavian pinewood ladder.
On the other hand, underneath that regimented ice cap of self-imposed order and control, hides the woman that walks into a grocery store in Spain and buys a box of cat food by pointing her index finger into her wide-open gaping mouth and speaking the words ‘meow meow’. The same woman who has mastered the art of overly dramatic Japanese Kabuki-style facial expressions to anything that she finds a) odd, b) inappropriate, c) silly or d) all of the above (*)… It sometimes brings me to the brink of embarrassment, evoking a sheepish smile and a spontaneous “I’m sorry, she’s not from around here” response.
(*) Per example, she once addressed an unassuming diner waitress with a Maori battle cry when the poor woman came around to kindly refill her beverage and caught my mother off-guard. You see, Cecilia doesn’t believe in wasting any food or drink (and isn’t that a good Christian virtue?!), so even though she is full, her own set of imaginary rules mandates that she MUST finish whatever is presented to her. Also… she did NOT want any ice in her drink!!!!

This year, since our apartment is at full capacity and my mom fully expects me to lodge her in my house regardless of that fact, I tapped into my professional travel network & award points and was able to conjure free lodging for an epic 7-day road trip through the Southwest USA. It’s an adventure we’re both excited for, if it weren’t for my car having trouble with its right front wheel all of a sudden. We don’t even have enough money to make it through the month at times, let alone that I’m now having to face a dreaded trip to the mechanic, so he can take a look at it and tell me it’ll be $637.41 or so to fix it… Hurray! Let me write you a check. Right. This. Minute. I’m not sure what I’m going to do. I guess God will take care of that predicament in due time. Note to self: have faith.

If our financial situation was a person, it would probably be a circus freak. Maybe even the Elephant Man. Or Quasimodo. I picture this is what mom went through as well as a single parent with a delinquent ex-husband. I pretty much spend my entire days worrying in anxiety biting every penny in half, whilst scouring Pinterest in search of hearty rib-sticking meals that cost mere pennies. Our protein-plan exists out of chicken & kielbasa, and the occasional ground beef. We haven’t had ribs or a juicy roast in a good long while, and steak & fish have vanished off of our menu entirely due to their price tag. The thought of Thanksgiving & Christmas dinner currently gives me the willies. Pray that by then, we’ll be blessed by the hand of the forces that may.

Mom cooked a lot of ground beef recipes, and I do too. One of my beloved cheap(er) dinners is ‘Cottage Pie’. It’s flavorful, hearty and it feeds my family of 3 hungry men + yours truly for pennies on the dollar. To add bulk, I use a gaggle of root vegetables that caramelize slowly, which gives the whole dish another depth of flavor that I find very tasty. The recipe below fills my large 15’ Lodge cast iron pan + a smaller oven dish, and it typically feeds us twice.

IMG_2386.JPG

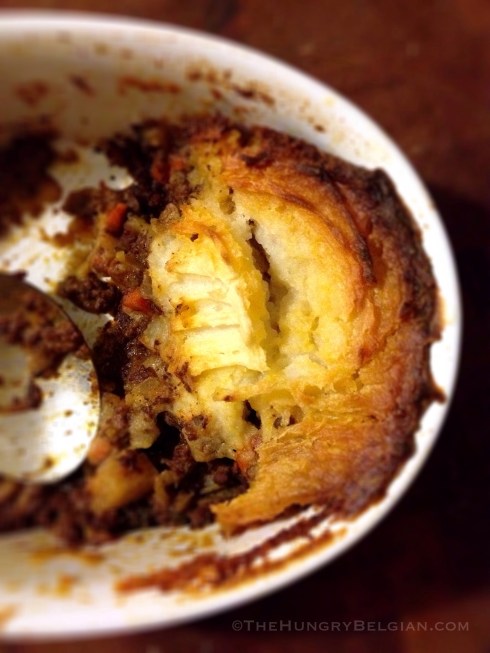
COTTAGE PIE WITH ROOT VEGETABLES
(a la Hungry Belgian)
For the beef mixture:
3 lbs of ground beef, at least 15% fat
1 onion, diced
2 rutabagas (or 2 small), diced
3 carrots, diced
2 parsnips, diced
1 celery root, diced
3-4 ribs of celery, diced
4 cloves of garlic, minced
1 6oz can of tomato paste
A handful of thyme & rosemary tied together in a bundle
A few dashes of ‘kitchen bouquet’ browning liquid or Worcestershire sauce
3 Tbsp of flour
1 16oz bottle of Stout beer or a dark beer of your liking
Salt & pepper to taste

I use a Dutch oven to cook the filling, but you can use any heavy large pan. Start by dicing the vegetables into even dice so they all cook at the more or less the same speed. Mince the garlic and have everything ready to go.

Start by heating up your pan over medium-high heat. When hot, add the ground beef and a few dashes of browning liquid, and crumble while browning. When it’s all browned, take it out of your pan and set aside. Drain some of the fat, but leave some so we can caramelize the vegetables in it.
Turn the heat down to medium-low, add all of your diced vegetables (excl. garlic) and let them slowly caramelize a bit for 30 min or so, stirring regularly to achieve an even browning.

When vegetables are browned, add beef back to the pan and turn heat to medium-high. Add tomato paste and brown the tomato paste with the vegetables & beef for 2-3 minutes. Then sprinkle a few tablespoons of flour over the lot, and brown another 1-2 minutes. Your pan will be cruddy on the bottom, but don’t worry, this crud adds a ton of flavor!
When mixture appears well browned, after 3-4 minutes, add beer and scrape all of the tasty bits off of the bottom of your pan over medium-high heat. Add minced garlic, rosemary & thyme bundle, then add salt & pepper to taste. Turn heat to medium, and let the mixture reduce & thicken for another 20-30 minutes. If too thick, add some water or beef broth. If too thin, keep simmering and I promise it will reduce further. When it’s done, take rosemary/thyme bundle out of the pan and allow the mixture to cool a bit.

For the cheddar mashed potatoes topping:
5 lbs of Yukon gold potatoes
4-6 Tbsp of butter
Approx 1-1.5 cups of milk
1 cup of grated white cheddar
1 tsp of grated horseradish (not horseradish sauce!) (completely optional)

Peel, cube & boil potatoes until soft. While the potatoes are cooking, warm the milk & butter in the microwave until melted & combined. Add salt & pepper to milk mixture, per your preference.
When potatoes are soft, drain them and mash them as usual. They will be lumpy, which is what I like best. Add warmed milk mixture to mashed potatoes a little a time, until you achieve a soft but form mash and the milk mixture is well-incorporated. You may have to use a bit more or less.
Add grated cheddar & horseradish (if using), and fold until blended. Your potato mash should be firm and not too soft.

Butter or grease your oven dish(es) and spread all of the beef mixture on the bottom(s). Top the beef with the mashed potatoes to fully cover the beef layer. My personal cottage pie math is, is that I like to have 2/3 beef mixture and 1/3 potatoes on top. You can do half/half, it’s whatever you prefer, really. With a fork, make a few lines or crimps in the potato layer, so that when it brow in the oven, you’ll get crispy edges on those ridges. Alternatively, you can also pipe your mashed potatoes on top of the beef mixture ‘duchesse’-style.

Bake in a 375F oven for approx. 30-45 min until the edges of the potatoes are well browned. Serve hot, with a pint of Guinness and an Irish joke or two.

Bon appetit!

Picadillo Cubano

22 Aug

I’ll come right out and say that I knew very little about ethnic food whilst growing up in my small, rural neck of the woods. My mom would sometimes experiment with ethnic food, such as that time she prepared ‘babotee’. OMG!. Babotee!. I think my brother & I are still mentally scarred from that one. Funny enough, I have no memory whatsoever of having eaten anything exotic after the babotee disaster, so I’m thinking that that African devil even struck a nerve with mom. We didn’t have much money and food was never wasted, and that was both a promise as well as curse since you knew that when something didn’t turn out quite well, we’d still be eating it! Babotee was right up there with canned bananas.

Anyway, my first ‘real’ exposure to exotic cuisine was when I went to the ‘Polé Polé Festival’ in Gent (Belgium) with a few friends and enjoyed my first Mojito and roast pork. One of the things I probably miss most from Belgium, are the sultry Summer music festivals and their colorful posters that were haphazardly tacked on wooden telephone poles & announcement boards across town. The featured bands usually hailed from Northern Africa, Central & Latin America and flamenco heartbeats like Spain & Portugal. The band names alone were enough to lure us out of our rural shell: Radio Tarifa, Youssou n’Dour, Ojos de Brujo, Cesaria Evora… The sound of African drums and the exotic smells that wafted over the concert meadow, took us far away from the sugar beet fields & farms surrounding our houses. And when the heat became too much for the atmosphere and the torrential downpour of a typical Belgian thunderstorm came rolling in, we’d all huddle in the festival tents and it felt like a tropical vacation. It’s precisely there, in that oppressive hot tent, that my love for global music and world cuisine was born. My friend also found love for Ntibanoboka from Burundi there… but we shall say no more.

African, Caribbean & Latin cuisines are the type of culinary exploration that I haven’t really ventured into yet. I can follow a recipe, of course, but it’s not like I can add a little bit of this & a little bit of that and come up trumps. I have little to no understanding of flavor combinations in exotic cooking, yet I love mostly all ethnic food that I’ve eaten at small family-owned hole-in-the-wall type eateries as well as fancy restaurants. Now that our finances are seriously strapped and firmly rooted in the chicken & ground beef realm of things, I miss going to our favorite restaurants. Havana Mania in Inglewood, CA is no exception. I love that Cuban place. Not only do they serve the meanest mojito’s there, but the owner usually welcomes us with a broad smile and open arms, as though we’re his long lost relatives finally returning home. And it doesn’t matter if we haven’t been there for months, he still greets us like we were there just yesterday. I like that kind of gregariousness.

Yesterday, I figured I’d try my own hand at Cuban cuisine. I still had 2 lbs of ground beef in the fridge, and I remembered eating a beef dish at one time called ‘Picadillo Cubano’. It’s a delectable concoction of ground beef that is slowly braised in white wine, with capers, olives & raisins. It’s usually served over white rice, with black beans and fried plantains on the side, but it turns out it’s also often used as a filling for empanadas. Some add potatoes to it, other don’t and it seems to be the topic of many debates about authenticity. Personally, I think it’s one of those dishes that has local flair and varies depending on whom you ask… Either way, it’s seriously delicious and we cleaned off our plates in record time. As an added bonus to the fantastic flavor, it’s very budget-friendly and a breeze to make. Gloria Estefan’s nana was right on the money with this one.

IMG_2378.JPG

PICADILLO CUBANO
(as per Gloria Estefan’s nana)
– Approx. 2lbs of ground beef, the fatty kind (any ground beef with at least 15% fat)
– 1 medium-large onion, finely diced
1 large green bell pepper, finely diced
3-4 cloves of garlic, minced
1 tsp of cumin
1 tsp of ground dry oregano
1 8oz can of tomato sauce
1 ½ cups of dry white wine
2 bay leaves
2 Tbsp of capers (optional)
½ cup of ketchup
½ cup of raisins
½ cup of green pimiento-stuffed olives
Salt & pepper to taste
Olive oil for browning

In a large heavy pan with lid, brown the beef over medium-high heat until crumbled, stirring occasionally. Remove beef from pan and set aside, and drain all but 2Tbsp of the grease.

Add diced onions, bell pepper and minced garlic to the pan. Sauté over medium heat until onions turn translucent, stirring frequently. Sprinkle oregano & cumin over the vegetables, and give it a quick stir for another minute or so. Then add reserved beef and all of the remaining ingredients to the pan.

Cover the pan and allow beef mixture to simmer for 30-40 min, removing the lid for the last 5-10 min.

Serve beef stew over rice, alongside black beans and fried plantains for a true Cuban experience.
This dish goes great with a mojito, or two…

Mason Jar Salads

12 Aug

Mason jars. Aren’t they just fantastic? Not like a ‘Bananas Foster’ kind of fantastic, but more like a ‘ooh, look!’ kind of fantastic. I already own a not-so-modest selection of small & medium glass jars that currently sit on my shelf showing off their pale hues to one another in anticipation of being called upon for my random storage needs, but then Pinterest beguiled me last Saturday morning with the idea of ready-to-eat ‘grab & go’ salads in mason jars. In that precise moment, the moment in which I brought my iPhone closer to my face so I could actually see what was on the screen, I heard cherubs plucking tiny golden harps. Honest to God.

I’m not a fan of office lunches. Mostly because my weekday lunches in our small office kitchen are boringly uneventful, and the selection of food that is available for purchase in the immediate walking area surrounding LAX airport, pales in excitement compared to my grandma’s knit sweater. I either have the option of buying overpriced food at one of the fancy airport hotels nearby, or I can go to the only 2 places available that are within walking distance, neither of which is particularly exciting. About half the time I end up packing my own lunch at home, but getting up at 05:30A to do so is most definitely not fun, and my packed lunch usually symbolizes this pre-dawn Beowulf mindset.

So when I saw these mason jar salads on Pinterest last Saturday morning, it felt like I got struck by lightning… Not only do they look so very tasty & fresh, they require zero prep in the morning. BINGO! As an added bonus, my colleagues can do all the shoving they want in the office fridge, since my salad jar fits in the refrigerator door and is not exposed to the brutality that is a community refrigerator. Since I have an impulsive streak, I can tell you that by Saturday afternoon we were at our local hardware store and by Sunday morning, my 12 shiny new quart-size mason jars had gone through 2 hot cycles in our dishwasher. When I open the refrigerator door now, and see my colorful mason jar salads neatly lined up on the shelf, it almost makes Monday mornings feel like less of a satanic cult a drag. Almost.

I used quart size jars, but feel free to use pint size jars or any size jar you like, really. Just keep in mind that for these salads to last the full 5 days that they reportedly stay crisp and fresh, you have to layer them properly. If they aren’t layered properly, fuhgettaboutit!. Also, keep the dressing in the bottom and don’t shake or tip them. You want that dressing to live its lone solitary life in the bottom of the jar until such time you’re ready to dump & eat.
I posted an Asian Chicken Salad below that I found on foxeslovelemons.com, but you can let your creativity run wild. The idea is to place all your salad toppings in the jar first and end with lettuce, so that when you dump the jar out into a bowl or on a plate, you have a no effort gorgeously crisp salad to eat without any prep.

Proper layering is key:

BOTTOM: dressing. Use dressing that easily pours out of a jar. I used simple vinaigrette variants, but if you like creamy dressings, dilute them a little with cream or milk so they’ll easily come out. In a quart size jar, you want to cover the bottom ½ inch. It’s tempting to add more, but it’s not necessary.
FIRST LAYER: this layer of vegetables will actually sit in the dressing itself, so use any kind of vegetables that are hardy and can withstand pickling. These vegetables will absorb some of the dressing, making them even more flavorful. You can also add ‘al dente’ noodles and pasta here, and they’ll absorb some of the dressing too. Build this layer so it towers slightly out of the dressing and forms the base for the next (dry) layer. (e.g. cucumbers, carrots, onions, peppers, cabbage, rice noodles…)
SECOND LAYER: This layer will be the first layer that will actually not come into contact with the dressing, but may still absorb some the dressing flavor from sitting in the jar. You want to use vegetables or toppings that will benefit from absorbing some of the dressing flavor without actually touching the dressing. (e.g. tomatoes, edamame beans, regular beans, olives, corn…)
THIRD LAYER: nuts, cheeses and meats. This is where the final toppings come into play. They are far removed from the dressing and stacked to ensure your salad stays crisp and fresh for up to 5 days.
TOP LAYER: lettuces. Unless you shake or tip the jar, which is a no-no in jar salads, your lettuce will stay crisp and fresh just like it would if you were to store it by itself.

If you follow the above layering order, you should end up with easy ‘grab & go’ salads that will stay fresh & crispy in your refrigerator for approx. 5 days. If you’re like me, and you lack time on weekdays to get everything done that you need to in the first place, then these are a godsend come lunch time. I don’t know who came up with this idea but whomever you are, I bow to your genius.

IMG_2341-0.JPG

ASIAN CHICKEN SALAD
Based on a recipe from foxeslovelemons.com)
– 3 quart size mason jars (or more, if smaller size)
– 1 large boneless & skinless chicken breast, poached in broth, cooled & cubed
– approx. 1.5 cups of shelled edamame beans, cooked
– 2 red bell peppers, cut into thin strips
– 3 carrots, julienned or cut into thin sticks
– 1 10oz package of Udon or Soba rice noodles, cooked, cooled & drained
– 1.5 cups of raw soybean sprouts (if you can’t find them, don’t worry. You can leave them out)
– 1.5 cups of unsalted, roasted peanuts

Boil noodles according to package instructions. Drain, rinse with cold water and allow to cool completely.
Pour dressing (see below) into each jar, until approx. ½ or ¾ of an inch in height. You don’t need any more, trust me.
Place a layer of noodles in the dressing until they tower above the dressing (+/- 1.5 – 2 inches high)
Place a layer a of carrots on top of the noodles, then a layer of bell pepper (approx. 1 inch each, but this is not an exact science. J)
Sprinkle a handful of edamame beans on top of the bell pepper, then top with soybean sprouts.
Finish veggies with a layer of diced chicken and top with peanuts.
Screw lid on jar and refrigerate. Repeat with remaining jars.

For the dressing:
– 1 cup of extra virgin olive oil (or any oil you like)
– 1/4 cup of soy sauce
– 1/3 cup of rice vinegar
– 4 hefty squirts of Sriracha for medium-spicy dressing (depending on how spicy you want things)
– 3-4 large scoops of peanut butter

Put everything in a small mason jar and stir to dissolve peanut butter just a bit, screw on lid and shake vigorously until well-combined.

Swedish Kisses

17 Jul

Oh hey!… I have a blog!

I apologize for being a blogging hermit since Jan 2014 lately. I finally stopped working 7 days a week, hallelujah! Technically, this means I have free weekends to devote to my small apartment kitchen and wee blog, however, it so happens to be that these free weekends coincided with the FIFA World Cup of Soccer, et voila… there is no time for blogging when soccer is on, folks!

I’ve always been a sports lover. Besides swimming and volleyball, and a brief stint with judo, I also threw a mean javelin in our local athletics club. I even made it to the varsity-level Belgian National Championship, and competed in javelin as well as the ever-so-feminine shot put and discus hurling. Considering I ended at the top in all three disciplines, it appears that I’m good at throwing stuff. Mind you, this innate throwing-ability had previously been evidenced when little Tootsie Farklepants was banned from the county fair’s ball-throwing booth. I was just a wee little pig-tailed waffle girl. The mustached carnivalmeister was not impressed with my bull’s eye precision when I repeatedly knocked over pyramid after pyramid of neatly stacked cans, with only a handful of flimsy beanbag balls. He’d angrily cross his tattooed arms and lock his piercing blue ice-cold eyes into mine in a tense stand-off. Undeterred, I’d proceed with winning a half dozen top shelf prizes, resulting in my father being curtly told by raspy-voiced Popeye that I wasn’t allowed to play anymore. It was an injustice too big to comprehend. It shaped my competitive spirit, and taught me the art of hustling at the ripe age of 9. I would clean him out of top shelf prizes for years to come, since he couldn’t remember me amongst the hundreds of kids that would frequent his establishment during carnival times. I never forgot. #Karmastings

Nowadays, my love for sports mainly manifests itself in eating copious amounts of food whilst cheering on my favorite teams. To aid me in my quest, I spent the past 5+ years transforming my nicely toned triceps into bat wings, so that the flapping motion of my cheering arms deters any flying insect within a 5-foot radius from landing on my chips & dip. As always, I’m at the top of my discipline here.

Now that the championship is over and Germany took home the FIFA trophy, I felt it opportune to bake something last Sunday. Anything, really. I work in an office full of Germans, and I swear, baking must be the 11th Commandment in Germany: “Thou must baketh something every week, or elseth thou shalt become Austrian”. Seriously, turning Austrian is every German’s worst fear. I kid you not.
But we digress… In a moment of misplaced German patriotism, what with being Belgian and all, I felt the burning need to bake something. Any time I try to bake, I end up with Godzilla from hell. I’m simply not good at baking, but strangely enough, I often feel like baking. I figure that at age 43, I’m probably baking at the level a German 5-yr old pulls off in his/her Fisher Price play kitchen, but whatever. Rome wasn’t built in one day either. And if you too suffer from sub-par baking skills, then these cookies are made for you as well. The recipe calls for exactly 4 ingredients. Four! How can that even go wrong, right?

20140717-065132-24692982.jpg

Swedish Kisses
(as per my colleague Melanie’s recipe, who probably saw it in some magazine or so…)

– 2 sticks of good quality softened butter
– ½ cup of plain white granulated sugar
– 2 cups of sifted, all-purpose flour
– your favorite jam or jelly

Preheat oven to 375F.

In a bowl and with a handheld electric beater (or in your fancy Kitchenaid mixer), beat the butter and sugar together until pale and fluffy. Add sifted flour a little bit at a time and incorporate it into the butter/sugar mixture with the beater on low speed. Trust me, you want this to be on LOW speed unless you don’t mind flour cakes in your arm pits.

When all the flour is well-incorporated, you will end up with a very crumbly mass resembling coarse wet sand. Take a bit of that crumbly dough in your hand, and roll into a ball about the size of a small apricot. Place that little ball on your lined baking sheet, and push your thumb into the center to create a little well or divot. Hence, ‘thumbprint cookies’.

Fill that little divot with your favorite jam, and bake cookies in the center of your oven for approx. 15-20 min until the edges are golden brown. They will be like crack cocaine buttery and crispy.

Mediterranean Orzo with Roasted Vegetables & Lemon Zest

11 May

Dinner parties. It’s a time for pretty table linens, elegant dinnerware and culinary flights of fancy. A time in which my little apartment kitchen seems all too tiny and I start dreaming of a spacious farm kitchen, complete with brick walls and weathered wooden family table. When I was a child, our house was usually filled with dinner guests on Saturday evenings. My brother & I knew the kitchen was off-limits for pretty much the entire afternoon, as mom was in there whirling like a tornado and mostly cooking a 6-course meal for guests that would arrive later in the evening. Setting foot on the tile kitchen floor, meant the risk of being sucked into mom’s dishwashing vortex so we generally steered clear.

Fast forward 35 years, and – despite my good intentions – I realize I have turned into my mother. Rats. While I’m not yet wearing high-waisted hot pink capri pants that reach to my bra straps, or pee behind a spruce in Yosemite NP because the call of my bladder is far stronger than the language on any of the Park Ranger warning signs, I share my love of cooking with Cecilia. I enjoy entertaining guests with food I prepare, and I take joy out of billowing crisp, brightly colored linens over my table in preparation of the festivities. I enjoy buzzing around in my kitchen, hovering over pots & pans and making sure my guests will ooh & ah, whilst at the same time banning my house elves family members from entering the kitchen with a certain air of authority and mild annoyance. (*)
(*) Note to self: Must fight this genetic pattern before hot pink capris become all the rage.

Yesterday, J. was coming over for dinner. She had to drop off some papers, so – naturally – I suggested I cook dinner for all of us. I had planned on cooking a big pan of my lemon-braised chicken and serve that family-style, since I had to work all day and didn’t have much time whip out my whole arsenal of culinary wizardry. Lemon braised chicken has such a unique flavor, that it’s always a bit hard to find a side dish that will accompany it flawlessly without being blah, but the orzo below did just the trick. The roasted vegetables burst with flavor and are slightly caramelized which brings a note of sweetness, while the lemon dressing breaks that sweetness with the right amount of tang. The freshness of the scallions and basil not only adds to the wonderful flavors, but also makes this really pretty t look at.

20140511-145135.jpg

MEDITERRANEAN ORZO WITH ROASTED VEGETABLES & LEMON ZEST
(inspired by a ‘Barefoot Contessa’ recipe)
– about 2 cups of uncooked orzo pasta
– 1 red bell pepper, sliced into 1 inch pieces
– 1 yellow of orange bell pepper, sliced into 1 inch pieces
– 1 small eggplant, diced into 1 inch pieces
– 2-3 small red onions (tennis ball size), diced into 1/2  inch pieces
– 3-4 ripe lemons, zested & juiced
– 1 bunch of scallions, sliced thin
– 1/4 cup of pine nuts, toasted
– 2 good handfuls of fresh basil, julienned or sliced into thin ribbons
– 2-3 cloves of ROASTED garlic (optional)
– olive oil (+/- 1 cup)
– salt & pepper to taste

Preheat oven to 425F.

Place the peppers, onions & eggplant on a baking sheet, sprinkle with salt & pepper and coat liberally with olive oil on all sides. Roast in the oven until tender and caramelized, approx. 30-40 min. Set aside and allow to cool to temperature. Turn off oven.

In a small sauce pan, toast pine nuts until golden brown. Set aside and cool.

Zest 3-4 lemons, and set zest aside. Slice scallions and basil, and set aside.

For the lemon dressing, juice zested lemons into a measuring cup or bowl. Preferably one with a pour spout. You should have approx. 1/2 cup of lemon juice. Add about 3/4 cup-1 cup of olive oil to the lemon juice and blend well. Add salt & pepper to taste. Add pureed roasted garlic to the dressing, if you desire.

Bring a large pot of liberally salted water to a boil, and cook orzo according to package instructions. Drain well and pour into large serving bowl.  Immediately, while hot, pour about half of the lemon dressing over the pasta, and coat well so it won’t stick as it cools to room temperature.

When pasta is cool enough to handle, add roasted vegetables & lemon zest to the orzo, and gently fold until well combined. If the pasta salad seems a bit dry, add some more lemon dressing. Fold in toasted pine nuts, scallions and basil. keep a few basil leaves for decoration.

You can eat this pasta salad warm or cold. This recipe will make a large bowl that will comfortably feed 8 people or more. It can be served as a side, or with crusty French bread for a light lunch.

Bon Appetit!

Hunter’s Chicken

1 May

Legend has it that ‘chicken Cacciatore’ [catch-ah-toh-ree], or chicken in the style of the hunter, originated somewhere in Central Italy in the Renaissance period (ca. 1450-1600). You know, that part of history of awful torture, the black plague, magnificent art and ornately corseted powdered women practicing the harpsichord. Maybe Lady Gaga is on to something?

But we digress… In those times, the only people who could afford to enjoy a delicacy such as poultry, were the well-to-do Italian noblemen who indulged in hunting as a form of entertainment. Wait. Hunting chickens?! What? This almost resembles drunken history. I’m pretty sure that medieval Italy did not harbor flocks of ferocious free-roaming wild chickens in its woods, so let me go out on a historical limb and state that the Italian aristocracy probably hunted for pheasant. Possibly even quail.

Upon return to the homestead, the hunting party would stop on the trail and his lordship would turn to his page boy and say: “Luigi, picketh these  shrooms & herbs for they shalt tasteth awesome in the chicken pheasant soup”. Well, maybe not entirely like that, but the dish received its name because reportedly  the hunters would return from the woods with wild mushrooms and fragrant plants, all of which would be handed off to the house cook, who was then responsible for turning this into a meal (hm? Deja-vu much?). Rumor has it that tomatoes were added because their acidity tenderized the meat in question, and olives & onions were often added for flavor. I don’t know the history behind the aspect of wine being added, but I suspect a busty jezebel is part of the equation. The dish was served in tin bowls with big honks of crusty bread, since silverware didn’t make its debut until the 1700’s.

‘Hunters’ Chicken’ has many varieties but it’s always a tasty stew of poultry, slowly braised in a tomato sauce with mushrooms, onions, garlic and wine. The selection of herbs depends entirely on the region you are in, and olives don’t always make an appearance either. In short, there is no right or wrong way to prepare chicken cacciatore, there is only the tasty way. Below is my version and I opted for tarragon and parsley. I love the flavor or tarragon and it goes well with the olives and wine that are in this dish as well. Enjoy!

20140501-111820.jpg

HUNTER’S CHICKEN
(Adapted from a traditional Italian Chicken Cacciatore)
– 8-10 boneless, skinless chicken thighs
– 1 28oz can of peeled whole tomatoes, crushed by hand (or a large can of crushed tomatoes)
– approx. 24 oz of mushrooms, sliced  (*)
– 1.5 cups of dry cured black olives, pitted (or a 12-14 oz can, drained)
– 1 large onion, diced
– 4-5 cloves of garlic, minced or grated
– 1/4 cup of finely chopped fresh tarragon
– a good handful of fresh parsley, finely chopped
– 1.5 cups of dry white wine
– 4 Tbsp of flour
– salt & pepper to taste
– butter and/or olive oil to brown the chicken
(*) this may look & sound like a lot of mushrooms, but mushrooms shrink down to nothing when cooked and you want these mushrooms to be a key ingredient in your dish. I used a combination of baby bella mushrooms and regular white button mushrooms, but you can use a variety of wild mushrooms too. Just make sure they do not vary too much in cooking time.

Rinse the chicken thighs and pat dry. Season with salt & pepper set aside. Wipe the mushrooms clean with a  damp cloth, and slice into thick slices if large. DO NOT rinse your mushrooms in water, as they will absorb a lot of water and become less flavorful. If you dread this whole process, just buy a few bags of pre-sliced shrooms, and you’ll be fine as well.

Over medium-high heat, heat a bit of olive oil & 1 tbsp of butter (for flavor) in a large heavy pan. I used a 15-inch cast iron skillet for this dish, but you can use any large heavy pan. Brown the chicken on all sides for a few minutes and set aside. They will not be fully cooked, but that’s OK.

Add 1/4 of the wine and another tablespoon of butter and deglaze the pan, scraping up any browned chicken bits. Then add the onions and saute them until translucent and soft.

Dump all of your mushrooms in the pan. Don’t be alarmed. I know that ‘crowded’ mushrooms do not brown, but we’re not looking for beautifully browned mushrooms here, we just want to ‘sweat’ them out so they give off most of their juices. Continue to saute the mushrooms & onions, until the pans becomes mostly dry and the mushrooms appear slightly browned and soft.

Sprinkle the onions and mushrooms with the flour, and cook through for a minute more.

Add crushed tomatoes and their juices, the rest of the wine, garlic and 3/4 of the fresh herbs, and bring to a simmer. When simmering, nestle browned chicken thighs in the sauce and let simmer to cook through. Depending on the size of the thighs (doesn’t that sound kinky?), this will take another 30-45 minutes. Add the (drained) black olives during the last 15-20 minutes, simply to heat them through.

Finish the dish with a sprinkling of the remaining fresh herbs on top, and serve with crusty bread or over your favorite starch side.

Drunken Chicken

17 Apr

Good heavens. I’ve been working like a Peruvian mountain mule lately. Between my two jobs, the regular domestic wizardry household tasks and random chores, It’s surprising I even find time to use the loo. Let alone, cook a meal. As a matter of public confession, the Farklepants’ have pretty much been living off of pasta easy, one-pot meals lately.

A week ago, during a haggard grocery-store run on my way home, I had the brilliant idea to turn a 2-hour beer-braised beef stew into a 45-min hearty chicken stew. Wait. Before you pull that slow-cooker card, I confess that I have one. A very fancy one, as a matter of fact, courtesy of Cecilia… mother and personal whip hand extraordinaire. The thing is, even with a crockpot, you need to plan ahead and in order to plan ahead, you need time. Time to think about what to make. And there we have it: time + thinking about what to cook 24-hours prior to dinner, are a luxury commodity in my world lately. As a matter of fact, with rising at 05:00A and working a full day, I generally stop thinking after 08:00P altogether. On that note, am I alone in thinking that pajamas are perfectly acceptable attire at 04:30P? Anyone?

But we digress… As I was wandering aimlessly in my local ‘Vons’, I smelled beef stew. It was kind of a dreary, uninspiring evening and when that beefy aroma hit my nostrils, I wanted it. Like a blood hound, I sniffed my way through aisle 5, 6 and 7, before halting at the header of aisle 8, where the lovely Bernice with her Southern Texas drawl was stirring a pot of beef chili. Her well-manicured hands resting casually on a neatly stacked pyramid of cans, she beckoned me with her bright Fixodent smile and said “Try some, sweetie”. I’ll admit that it was hard to resist the call of her rhinestone embellished sweater-vest, but canned chili wasn’t going to cut it. Not even in my stupor of post-workday tiredness. Sorry Bernice.

Still obsessing over the idea of a hearty meal, I finally grabbed the usual beef stew stuff and figured chicken takes way less time than beef, and I ran with it. I thought to myself ‘how bad can it be?’, and clutched a six-pack of Newcastle ale on my way to the cash register. It was going on 07:00P and I just didn’t care anymore. Really. I tell you, this stew turned out to be rib-sticking delicious and very quick to make… It has all the traditional flavors of a regular beef stew, but takes 1/3 of the time. And with chicken being more budget-friendly, you have yourself a hearty dish of deliciousness for pennies on the dollar.

20140417-151817.jpg

DRUNKEN CHICKEN
(a Hungry Belgian creation)
– 10-12 boneless, skinless chicken thighs
– 1 large yellow onion, diced
– 2-3 large carrots, sliced
– 2-3 stalks of celery, diced
– 3-4 cloves of garlic, crushed or minced
– 1 6oz can of tomato paste
– 6-8 slices of thick cut bacon, sliced in strips
– 16oz of button mushrooms, halved (if small enough, you can leave them whole)
– 2 lbs of Yukon Gold potatoes, cubed in 1-inch thick pieces
– 2-3 cups of chicken stock
– 12-16 oz of brown ale/beer (I used 1.5 bottles Newcastle… and drank the other half)
– 4 Tbsp of fresh thyme, chopped
– 2 Tbsp of fresh rosemary, finely chopped
– 3 bay leaves
– salt & pepper to taste
– flour, to coat & brown the chicken
– olive oil, to sauté vegetables and chicken

Dice onion & celery in a approx. equal size dice, slice carrots in discs. Chop fresh herbs and set aside. Crush garlic and set aside.

In a large Dutch oven or heavy pot, without added oil or butter, sauté bacon over medium-high heat until crisp but not blackened. Set aside and drain all but 2 Tbsp of bacon fat from the pot.

Rinse & pat chicken dry. Season with salt & pepper on all sides. Coat dry chicken thighs in flour and brown over medium-high heat on all sides in the reserved bacon fat. Set aside.

In same pot, add a bit of olive oil to the crusty bacon grease and sauté garlic, carrots, celery & onions over medium-high heat until beginning to soften. Add in tomato paste and cook for another 1-2 min over medium heat. The bottom of the pot will be quite crusty by now. Add a hefty splash of beer to the pan, and scrape all the flavorful bits off of the bottom. Adding more beer, if needed.

Add reserved chicken & potatoes into pot, stir and cover with remaining beer and chicken stock. Add half of the fresh herbs and all bay leaves, and simmer uncovered over medium-low heat for approx. 30 minutes. If liquid gets low, add a bit more chicken stock or water. After 30 min, add in reserved bacon and mushrooms, and cook another 15-20 min until mushrooms are cooked thru and chicken is fork-tender. Season with more salt & pepper, if needed.

Discard bay leaves, sprinkle remaining herbs over the top and serve with crusty country bread.